Investing in a newly paved driveway is not just an aesthetic upgrade, just like any other home improvement project, a paved driveway requires regular maintenance to keep it in top-notch condition. In this blog post, we’ll explore some of the best practices for maintaining a newly paved driveway, from sealing to repairing small cracks and more.
A driveway is subject to constant wear and tear from weather conditions, UV rays, and the weight of vehicles. Over time, the surface can deteriorate, leading to issues like cracking, fading, and water damage. Regular maintenance not only extends the lifespan of your driveway but also saves you money by preventing costly repairs in the long run.
1. Re-Sealing Your Driveway

Sealing your driveway is not a one-time affair; it’s a continuous cycle that needs attention after your new driveway has been laid and professionally sealed. The initial seal often lasts for about two to three years, depending on the type of material used and the climatic conditions of your area.
Identifying the Need for Re-Sealing
The key to successful driveway maintenance is recognizing the signs that your driveway needs a new coat of sealer. Here are some indicators to watch out for:
Colour Fade: If your asphalt driveway has lost its rich, black colour and now appears grey, it’s a sign that the surface is exposed and needs a reseal.
Surface Cracks: While a few cracks are normal, an increase in the number and width (greater than 2 cm) of cracks indicates that the existing seal is failing.
Time: Simply put, if it’s been more than two years since your last seal, start planning for another one.
Choose the right sealer
Just like the initial sealing, it’s crucial to select a high-quality sealer designed for your specific type of pavement. Asphalt driveways often use coal-tar-based or asphalt-based sealers, while concrete driveways might use acrylic or penetrating sealers.
Select a high-quality sealer designed for your specific type of paving material. There are generally two types of sealers: acrylic and coal-tar-based. The choice depends on your personal preferences, climate, and the recommendations of your paving contractor. Contact the contractor who paved your driveway, if you are unsure which sealer to use, or for them to re-seal your driveway.
2. Repair Cracks
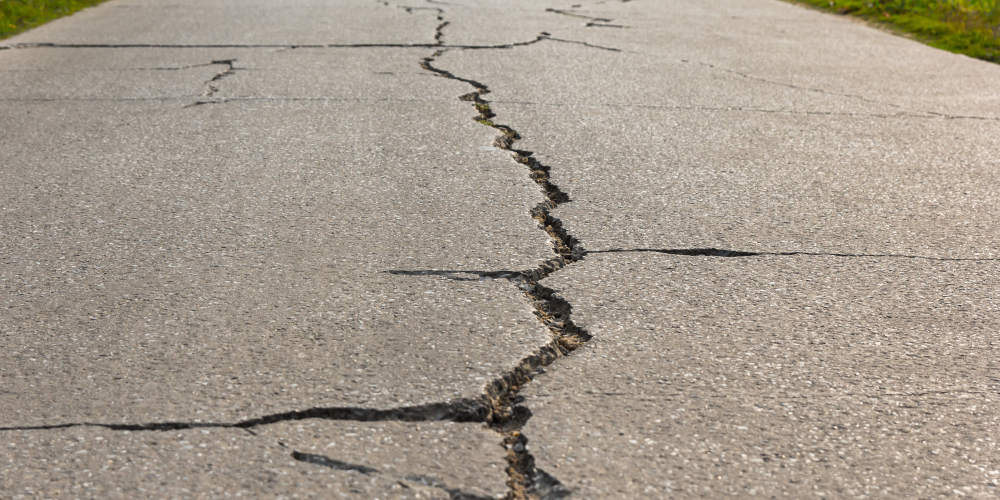
If you’re grappling with unsightly cracks in your concrete driveway, fear not—you can tackle the problem with confidence and restore your driveway to its former glory Regular inspections can help you catch cracks when they’re small—typically less than a few centimetres.
Assessing the Damage
Cracks that are 1 cm wide or less are considered minor and can usually be repaired with a simple sealant. However, if you find cracks that are wider than 2.5 cm, this may indicate more serious issues that could require professional assessment.
If you have a monitor crack at hand, whether you’re a seasoned DIY aficionado or embarking on a weekend project for the first time. Let’s dive into the tools you’ll need and the process for a successful concrete driveway crack repair.
Tools and Materials
- Concrete Caulk: Opt for a flexible polyurethane caulk that’s specifically formulated for sealing joints and cracks. A brand like Sika offers both self-levelling and non-sag options.
- Self-Leveling vs. Non-Sag Caulk: Self-leveling caulk is ideal for a smooth finish without manual intervention, while non-sag caulk, though thicker, requires hand-smoothing but is excellent for vertical applications or preventing drips.
- Caulk Gun: Ensure your caulk gun is compatible with the size of your caulk tubes for a seamless application.
- Spray Bottle + Soapy Water: A must-have for smoothing non-sag caulk and achieving a professional finish.
- Dry Sand: Keep this on hand to blend the caulk with your concrete’s texture.
How to Repair Cracks: 6 Simple Steps
- Prep the Area: Start with a clean slate by removing debris from the cracks. A pressure washer can be effective here. Ensure the area is bone-dry before proceeding.
- Apply the Caulk: Cut the caulk tube tip at an angle, matching the crack width. Apply the caulk, aiming for a fill that’s just below the concrete surface.
- For self-leveling caulk, seal the crack ends with non-sag caulk to prevent leakage.
- Smooth the Caulk: If using non-sag caulk, smooth it with soapy water and your finger—wearing disposable gloves can keep your hands clean.
- Add Sand for Texture: While the caulk is wet, sprinkle sand over it for a textured look that matches your driveway.
- Allow the Caulk to Set: Let the caulk cure according to the manufacturer’s instructions before walking or driving on it.
Top Tips for Concrete Driveway Crack Repair
- Level the Concrete First: Address any uneven slabs before caulking to prevent further damage and ensure a lasting repair.
- Consider Professional Help: If the cracks are larger than 2.5 cm consider contacting a proffesional. Caulking is an art, and for aesthetically pleasing results, sometimes it’s best to call in the pros.
3. Regular Cleaning

Over time, driveways accumulate a variety of debris, including leaves, dirt, sand, and even automotive fluids like oil and antifreeze. These substances don’t just affect the aesthetics; they can degrade the surface material of the driveway. Organic material like leaves and twigs can rot and produce tannin stains, while oil and other chemicals can break down the binding agents in asphalt and concrete, leading to surface deterioration. Regular cleaning removes these substances before they can cause irreversible damage.
Choose Your Tools Wisely
The tools you use to remove this debris can make a significant difference in preserving the condition of your driveway. Avoid metal shovels, as they can scratch and gouge the surface, leading to early wear and tear. Instead, opt for plastic shovels which are more forgiving on the pavement. For lighter debris, consider using a soft-bristle broom or even a leaf blower. These tools can effectively remove unwanted material without damaging your driveway.
While metal shovels are durable and efficient, they can be particularly harsh on paved driveways. The metal edges can easily scratch and gouge the surface, especially if you’re trying to remove stubborn debris. These small damages may seem inconsequential initially, but they can eventually escalate into larger cracks and crevices that require more extensive repairs.
- Plastic shovels: Plastic shovels offer a more forgiving alternative, especially on delicate surfaces like asphalt or sealed concrete. The softer edge is less likely to cause surface damage, making it an ideal choice for routine cleaning. They may not be as durable as metal shovels, but the trade-off is worth it to maintain the longevity of your driveway.
- Stiff Bristled Broom: For lighter debris such as leaves, dust, or sand, a stiff-bristle broom is a suitable tool. It effectively sweeps away loose material without scraping the surface of your driveway. When choosing a broom, look for one with flagged bristles, as they are specially designed to pick up smaller particles.
- Leaf blowers: An efficient alternative for removing lighter debris like leaves and twigs without any surface contact. However, be cautious with the setting you use; a too-powerful setting can disturb the sealing of your driveway.
- Hose or Pressure Washer: For a more thorough clean, you may use a garden hose with a spray nozzle or a pressure washer. If you opt for a pressure washer, use it on a low setting to avoid damaging the surface of your driveway. Always remember to point the spray away from your home or any other structures to avoid accidental damage.
Use the Right Cleaning Products
While chemical cleaners can be effective in removing stains and stubborn dirt, they can also be detrimental to the surface of your driveway, particularly if it is made of asphalt or is sealed. Always opt for pH-neutral cleaners that are specifically designed for driveway cleaning. Products that contain harsh acids or bases can deteriorate the sealing of your driveway, making it more susceptible to damage over time.
When using chemical products, always read the label and test a small inconspicuous area before applying it to the entire surface. Rinse thoroughly after cleaning to ensure that no chemical residue remains that could cause further damage.
- For Asphalt Driveways
Opt for a cleaner that is specifically formulated for asphalt surfaces. These are generally soap-based or emulsified solutions that can break down oil and grime without damaging the asphalt.
- For Concrete Driveways
For concrete driveways, a mildly acidic cleaner can be effective in removing stubborn stains like rust. However, be sure to rinse the surface thoroughly to neutralize the acid and prevent any damage to the concrete.
- For Sealed Surfaces
If your driveway is sealed, look for pH-neutral cleaners. These won’t disrupt the protective layer of sealant on your driveway.
Always remember to follow the manufacturer’s instructions when using any cleaning agents, and when in doubt, perform a patch test in an inconspicuous area.
4.Tree Roots and Your Driveway

We often overlook the impact of tree roots when considering the maintenance of our driveways. These roots can slowly but surely compromise the structural integrity of any paved area. The problem is, you usually won’t know there’s an issue until it’s too late. While trees add natural beauty to your landscape, their roots can push up from beneath the driveway, causing shifts, cracks, and even its complete breakdown over time.
Before reaching the point of no return with visible cracks or an uneven driveway, keep an eye out for signs like soil heaving near the trees or subtle shifts in the level of your driveway’s surface. If you identify these issues, you have a few options. The most drastic but effective measure is tree removal. A less severe but equally effective alternative is root pruning, where you selectively remove problematic roots that encroach upon your driveway. However, it’s essential to consult a professional before doing so, as improper pruning could compromise the tree’s health. For minor damages, resealing the affected area may suffice as a short-term solution.
Coclusion
Maintaining your newly paved driveway requires some effort, but it is well worth it in the long run. From sealing and crack repair to regular cleaning, these practices can extend the life and improve the appearance of your investment. Remember, a well-maintained driveway not only enhances your home’s curb appeal but also adds to its overall value.